Build a decentralized Amazon clone that accepts crypto

Introduction
In this guide, we will show you how to create a decentralized Amazon clone that accepts card and crypto payments.
Each item will be an NFT that we will create using Solidity. Even though items are priced in ETH, users can sign in with their email and checkout with their credit card if they want to. We'll be using Paper, Next JS, and Solidity.
Prerequisites
To follow this tutorial, you should be familiar with the following concepts:
- Web3: Familiarity with Web3 concepts and principles will help you better understand the decentralized nature of our project.
- React JS: React is a popular frontend framework for building user interfaces.
- Solidity: This is a programming language used for creating smart contracts on the Ethereum blockchain.
If you are already familiar with these concepts, you can dive right in. However, if you are new to any of these areas, do not worry! We will provide resources and explanations throughout the tutorial to help you follow along.
Installation
To make this tutorial easy for you, we have created a boilerplate project that you can clone and follow along with. Clone our boilerplate project from here.
After cloning the boilerplate project, you will need to install its dependencies:
npm installNext, install Hardhat, a super helpful library that will help you write and test your smart contract:
npm install hardhat --save-dev
Alongside Hardhat, install a helpful Hardhat helper package that will help you extend the capabilities of Hardhat:
npm install @nomicfoundation/hardhat-toolbox --save-dev
Next, install ethers.js, a library that will help you connect to your smart contract:
npm install ethers --save
Just like Amazon, we expect the users of our dApp to be able to checkout and pay for our products. We will achieve this using a web3 payment provider called Paper. Let's install the Paper Checkout SDK for React:
npm install @paperxyz/react-client-sdk
Next, install a package that will help you manage your environment variables:
npm install dotenv
Great! You have got your project all set up and you are ready to get started building your dApp.
dApp Structure
Before we start delving into the code, it's important to note that we won't be building a replica of Amazon - at least, not on our own! Building a comprehensive e-commerce platform like Amazon takes time, resources, and a large team of developers.
Instead, our focus will be on developing the foundational logic that underpins e-commerce platforms like Amazon. From the perspective of a user, we'll be creating a basic version of an online shopping platform that employs decentralized technology for enhanced security and control.
VIEW PRODUCTS -> VIEW SINGLE PRODUCT -> ADD TO CART -> CHECKOUT -> PAYMENT
This will be the flow of your dApp, and with that in mind, we will begin by building our smart contract and later, we will set up our product listing page.
Navigate to the starter React application you downloaded earlier and open it in VS Code or any code editor of your choosing. Once you open the app in your code editor, you should see a file structure that looks exactly like this:
📂 Amazon Clone
    L 📁 contracts
    L 📁 node_modules
    L 📁 public
    L 📂 scripts
        L 📃 deploy.js
    L 📂 src
        L 📁 abis
        L 📁 assets
        L 📁 components
        L 📁 pages
        L 📁 styles
        L  ...
    L 📂 test
        L  📃 test.js
Environmental Variables
To deploy our smart contract, we will need a blockchain API key from blockchain API providers like Alchemy, Infura, etc. In this tutorial, we'll be using ChainStack as our blockchain API provider, so go to ChainStack and create an account if you don't already have one. Since we're working on the testnet, we'll be using the Goerli Testnet Blockchain, so make sure to create a Georli network app on ChainStack.
Next, in the project's root folder, create an environment variable file called .env. After that's done, add these environment variables:
WALLET_PRIVATE_KEY=
API_KEY_TESTNET=
API_KEY_MAINNET=
Note: Be careful about pushing your keys to GitHub or any other remote repository. As a rule of thumb, whenever you create a .env file, create a .gitignore file and add this line of code:
//Filename: .env

.env
Building Our Smart Contract
If you'd like a faster and simpler way to create an audited contract, you can do so via an API call.
 Safwaan
Or even better, without code.
Safwaan
Before we get started with our smart contract, we need to set up our [hardhat.config.js](<https://hardhat.org/hardhat-runner/docs/config>) file. In our project's root folder, open the hardhat.config file and add the following:
First, import our dotenv and hardhat tools packages that we installed earlier:
require("@nomicfoundation/hardhat-toolbox");
require("dotenv").config({});
Next, initialize our secret keys:
const API_KEY_TESTNET = process.env.API_KEY_TESTNET;
const API_KEY_MAINNET = process.env.API_KEY_MAINNET;

const WALLET_PRIVATE_KEY = process.env.WALLET_PRIVATE_KEY;
After that, configure our networks:
networks: {
    goerli: {
        url: `https://eth-goerli.alchemyapi.io/v2/${API_KEY_TESTNET}`,
        accounts: [WALLET_PRIVATE_KEY]
    },
    mainnet: {
        url: `https://eth-mainnet.g.alchemy.com/v2/${API_KEY_MAINNET}`,
        accounts: [WALLET_PRIVATE_KEY]
    }
}
Our hardhat.config.js file should look like this:
require("@nomicfoundation/hardhat-toolbox");
require("dotenv").config({});

const API_KEY_TESTNET = process.env.API_KEY_TESTNET;
const API_KEY_MAINNET = process.env.API_KEY_MAINNET;

const WALLET_PRIVATE_KEY = process.env.WALLET_PRIVATE_KEY;

module.exports = {
    solidity: "0.8.4",
    networks: {
        goerli: {
            url: `https://eth-goerli.alchemyapi.io/v2/${API_KEY_TESTNET}`,
            accounts: [WALLET_PRIVATE_KEY],
        },
        mainnet: {
            url: `https://eth-mainnet.g.alchemy.com/v2/${API_KEY_MAINNET}`,
            accounts: [WALLET_PRIVATE_KEY],
        },
    },
};
Great! Now that we've got our React JS environment set up, let's dive into the real meat and potatoes of our decentralized Amazon clone - building the smart contract that will manage our marketplace!
To begin building our Amazon clone, we'll first define our structs and public variables for our contract.
One of our structs is called Item, which will store important details about the items in our marketplace. These details include the item's unique ID, name, category, image URL, the cost in wei, rating, and stock.
Additionally, we'll use IPFS to store the image associated with each item. To do this, we'll store the image URL in the image property of our Item struct and pin it to IPFS.
After defining our Item struct, we'll create another struct called Order that will hold information about a user's order, including the time of purchase and the item being ordered.
// Define a struct to hold item details
struct Item {
    uint256 id;
    string name;
    string category;
    string image; // Image URL to be pinned to IPFS
    uint256 cost; // Cost in wei
    uint256 rating;
    uint256 stock;
}

// Define a struct to hold order details
struct Order {
    uint256 time;
    Item item;
}
Moving on, we will create our mapping to tie our items to our orders. The first mapping will store the Item information based on its id. The second mapping will store a user's order history based on their address and the order ID. The third mapping will store the count of orders for each user.
mapping(uint256 => Item) public items;
mapping(address => mapping(uint256 => Order)) public orders;
mapping(address => uint256) public orderCount;
Finally, we will define two events that will be called when a user buys an item and when an administrator lists an item.
event Buy(address buyer, uint256 orderId, uint256 itemId);
event List(string name, uint256 cost, uint256 quantity);
Whenever a Buy event is called, we will store the user's address and the order detail in the event data. This is a very helpful and inexpensive means of storing data in a smart contract.
Awesome! We've got our variables all set up. Next, we will build out the functionalities of our contract. Our smart contract will have three main functionalities that we'll define in our amazon.sol file: Buy, List, and Withdrawal.
First up is the Buy function, which will allow users to purchase a product from our decentralized marketplace using ether. When a user buys a product, the corresponding amount of ether will be transferred to the smart contract, and the ownership of the product will be transferred to the buyer.
function buy(uint256 _id, address _buyer) public payable {
    // Fetch item
    Item memory item = items[_id];

    // Require enough ether to buy item
    require(msg.value >= item.cost);

    // Require item is in stock
    require(item.stock > 0);

    // Create order
    Order memory order = Order(block.timestamp, item
First up is the Buy function, which allows users to purchase a product from our decentralized marketplace using ether. When a user buys a product, the corresponding amount of ether is transferred to the smart contract, and the ownership of the product is transferred to the buyer.
function buy(uint256 _id, address _buyer) public payable {
    // Fetch item
    Item memory item = items[_id];

    // Require enough ether to buy item
    require(msg.value >= item.cost);

    // Require item is in stock
    require(item.stock > 0);

    // Create order
    Order memory order = Order(block.timestamp, item);

    // Add order for user
    orderCount[_buyer]++; // <-- Order ID
    orders[_buyer][orderCount[_buyer]] = order;

    // Subtract stock
    items[_id].stock = item.stock - 1;

    // Emit event
    emit Buy(_buyer, orderCount[_buyer], item.id);
}
Next, we'll create the List function that allows authorized administrators to add new products to our decentralized marketplace. Admins need to provide key product details like the product name, description, and price.
function list(
    uint256 _id,
    string memory _name,
    string memory _category,
    string memory _image,
    uint256 _cost,
    uint256 _rating,
    uint256 _stock
) public onlyOwner {
    // Create Item
    Item memory item = Item(
        _id,
        _name,
        _category,
        _image,
        _cost,
        _rating,
        _stock
    );

    // Add Item to mapping
    items[_id] = item;

    // Emit event
    emit List(_name, _cost, _stock);
}
Finally, we'll create the Withdrawal function that enables admins to withdraw ether from our smart contract to their designated wallet addresses. This function ensures that administrators can easily transfer profits earned from our marketplace to their desired wallets.
function withdraw() public onlyOwner {
    (bool success, ) = owner.call{value: address(this).balance}("");
    require(success);
}
We're going to declare a global public variable:
address public owner;
Next, we will create a modifier to protect our List and Withdrawal functions:
modifier onlyOwner() {
    require(msg.sender == owner);
    _;
}
Fantastic! We've written out the functionalities for our Amazon smart contract. Here's the complete source code:
// SPDX-License-Identifier: UNLICENSED
//Filename: contracts/amazon.sol
pragma solidity ^0.8.9;

contract Amazon {
    address public owner;

    struct Item {
        uint256 id;
        string name;
        string category;
        string image;
        uint256 cost;
        uint256 rating;
        uint256 stock;
    }

    struct Order {
        uint256 time;
        Item item;
    }

    mapping(uint256 => Item) public items;
    mapping(address => mapping(uint256 => Order)) public orders;
    mapping(address => uint256) public orderCount;

    event Buy(address buyer, uint256 orderId, uint256 itemId);
    event List(string name, uint256 cost, uint256 quantity);

    modifier onlyOwner() {
        require(msg.sender == owner);
        _;
    }

    constructor() {
        owner = msg.sender;
    }

    function list(
        uint256 _id,
        string memory _name,
        string memory _category,
        string memory _image,
        uint256 _cost,
        uint256 _rating,
        uint256 _stock
    ) public onlyOwner {
        // Create Item
        Item memory item = Item(
            _id,
            _name,
            _category,
            _image,
            _cost,
            _rating,
            _stock
        );

        // Add Item to mapping
        items[_id] = item;

        // Emit event
        emit List(_name, _cost, _stock);
    }

    function buy(uint256 _id, address _buyer) public payable {
        // Fetch item
        Item memory item = items[_id];

        // Require enough ether to buy item
        require(msg.value >= item.cost);

        // Require item is in stock
        require(item.stock > 0);

        // Create order
        Order memory order = Order(block.timestamp, item);

        // Add order for user
        orderCount[_buyer]++; // <-- Order ID
        orders[_buyer][orderCount[_buyer]] = order;

        // Subtract stock
        items[_id].stock = item.stock - 1;

        // Emit event
        emit Buy(_buyer, orderCount[_buyer], item.id);
    }

    function withdraw() public onlyOwner {
        (bool success, ) = owner.call{value: address(this).balance}("");
        require(success);
    }
}
Deploying Our Smart Contract
Before we deploy our contract, make sure you have enough Goerli ETH in your wallet. You can get more ETH by visiting the Goerli faucet.
Let's test it to make sure it's working:
npx hardhat test
You should see the following in your console output:
$ npx hardhat test
Compiled 1 Solidity file successfully

  Test Amazon Clone
    Deployment
      ✔ Sets the owner
    Listing
      ✔ Returns item attributes
      ✔ Emits List event
    Buying
      ✔ Updates buyer's order count
      ✔ Adds the order
      ✔ Updates the contract balance
      ✔ Emits Buy event
    Withdrawing
      ✔ Updates the owner balance
      ✔ Updates the contract balance

  9 passing (677ms)
Next, let's go ahead and deploy our smart contract. In the src/scripts folder, we have a file called deploy.js. We've gone ahead and written the deploy script for you with boilerplate so you don't have to worry about it yourself.
Our deploy.js script is deploying our contract and adding sample products for us to work with on our frontend. The sample products can be found at src/items.json.
Deploy the contract by running:
npx hardhat run ./scripts/deploy.js --network goerli
Once deployed, you should see a contract address and a few products added to the contract.
$ npx hardhat run ./scripts/deploy.js --network goerli
Downloading compiler 0.8.9
Compiled 1 Solidity file successfully
Deployed Amazon Contract at: 0x72bA3043DaF846451D74F8c4ee0641886B7f7eB3

Listed item 1: Camera
Listed item 2: Drone
Next, we have to copy our contract's ABI from the artifacts/contracts/Amazon.json directory to src/abis.
Remember to copy just the abi property:
"abi": [
    {
      "inputs": [],
      "stateMutability": "nonpayable",
      "type": "constructor"
    },
    ...
]
If all tests passed and our contract is deployed, then you're good to go!
Registering Our Smart Contract With Paper
Head over to your Paper dashboard. If you don't already have an account, then create a free account, and let's get started.
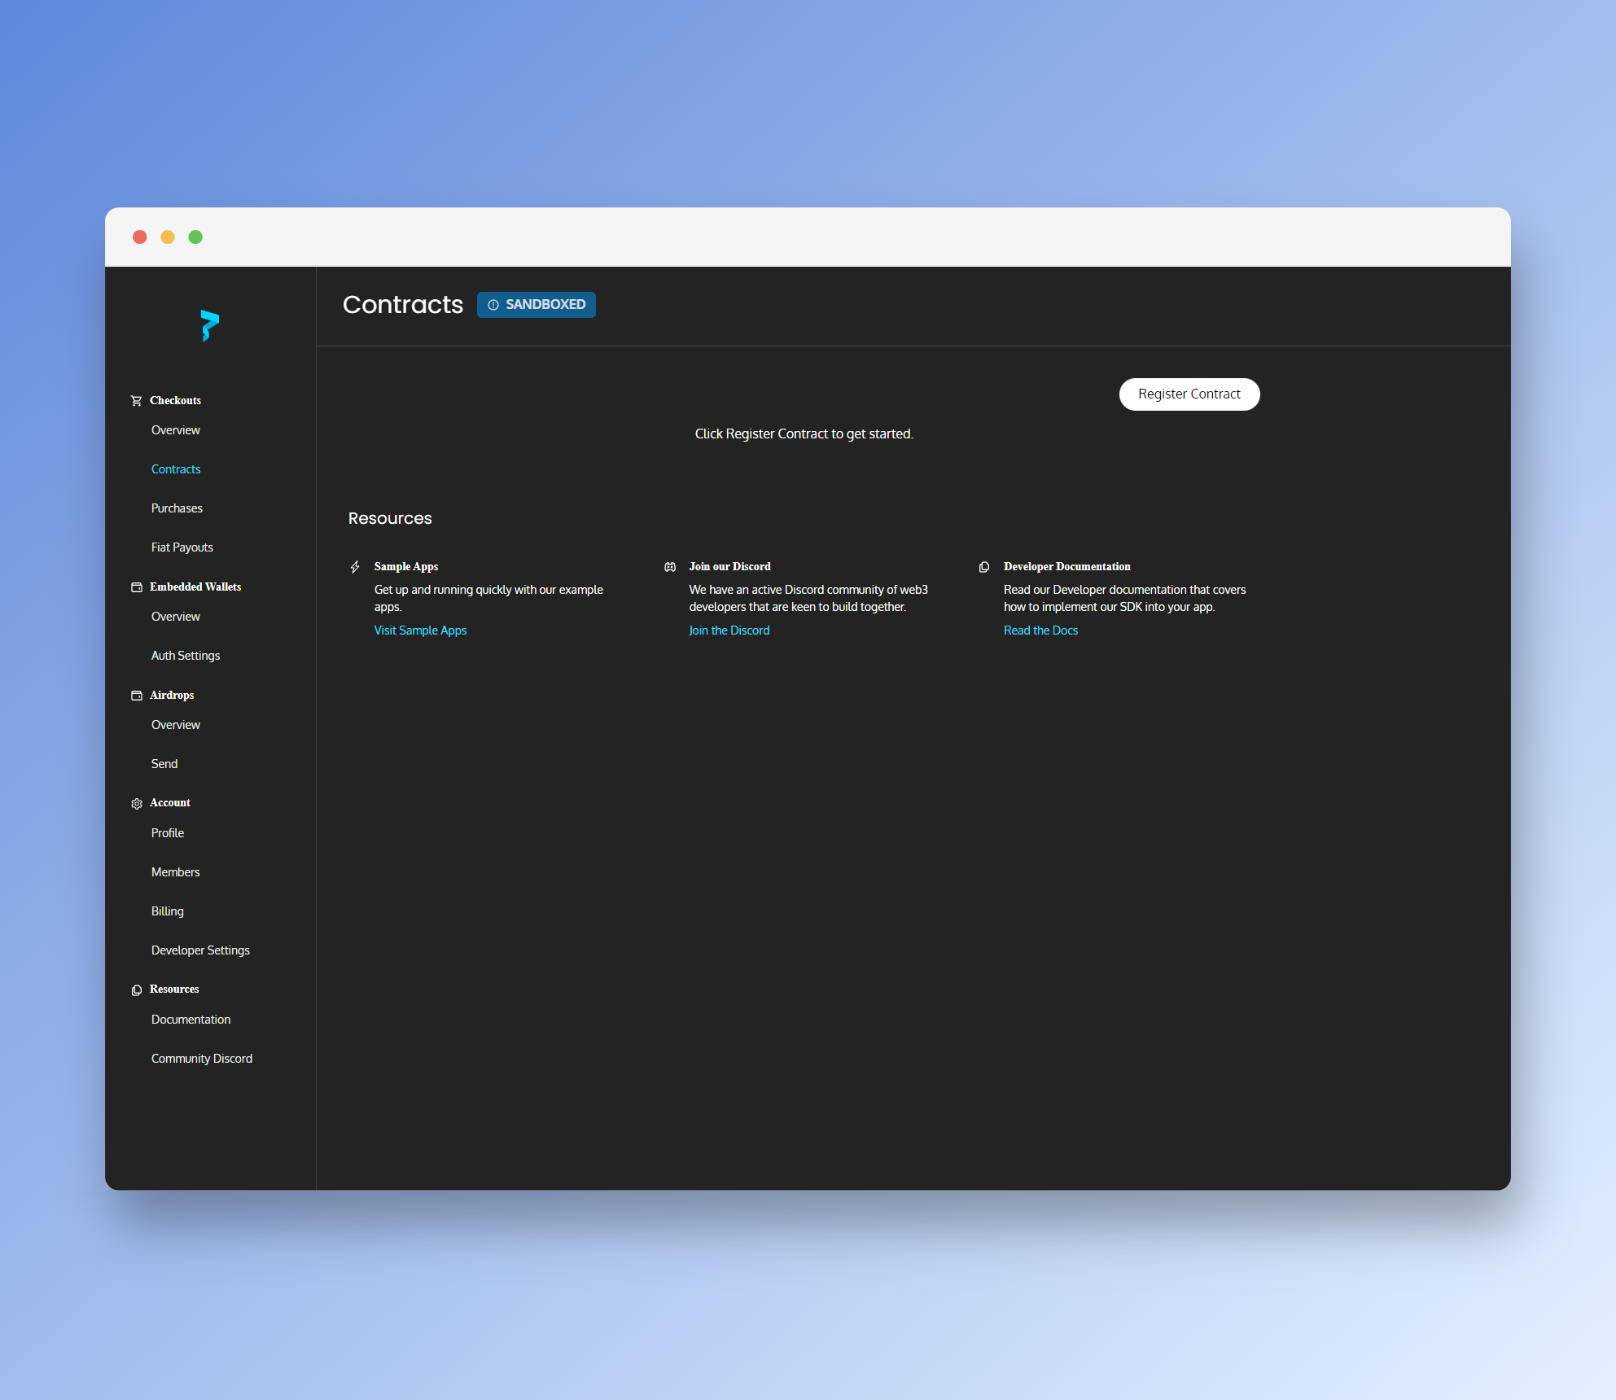
Next, click the "Register Contract" button:
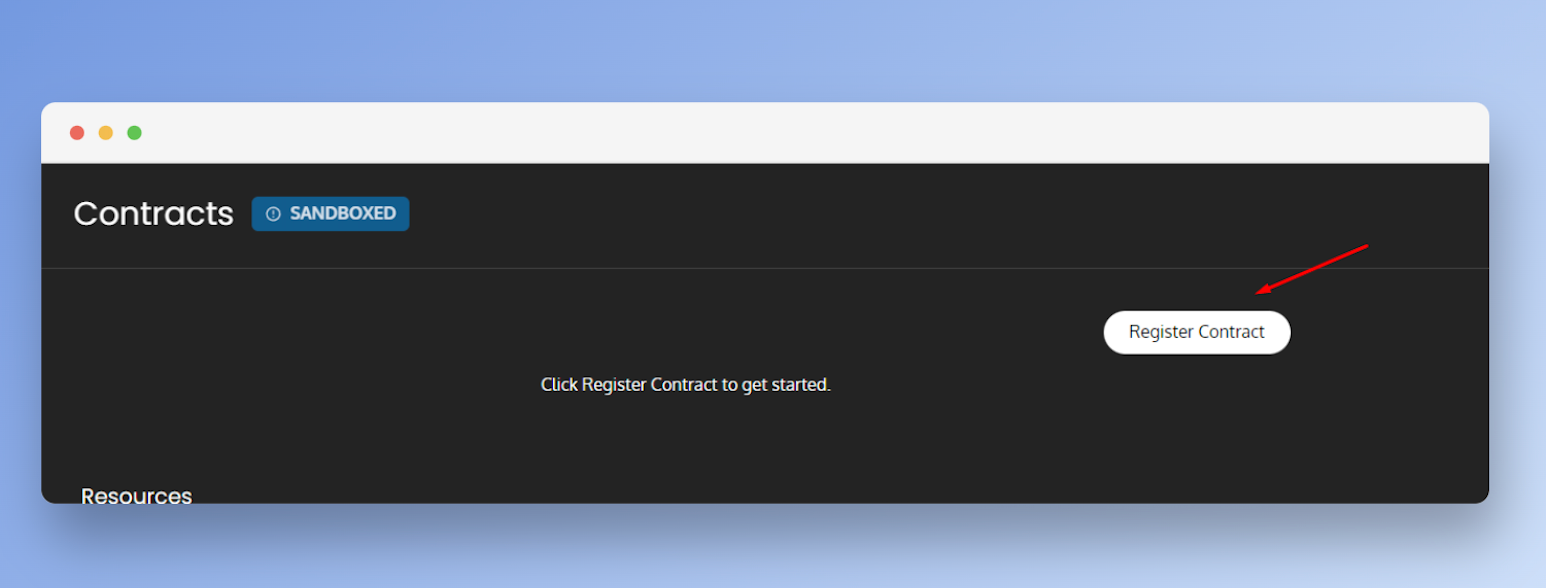
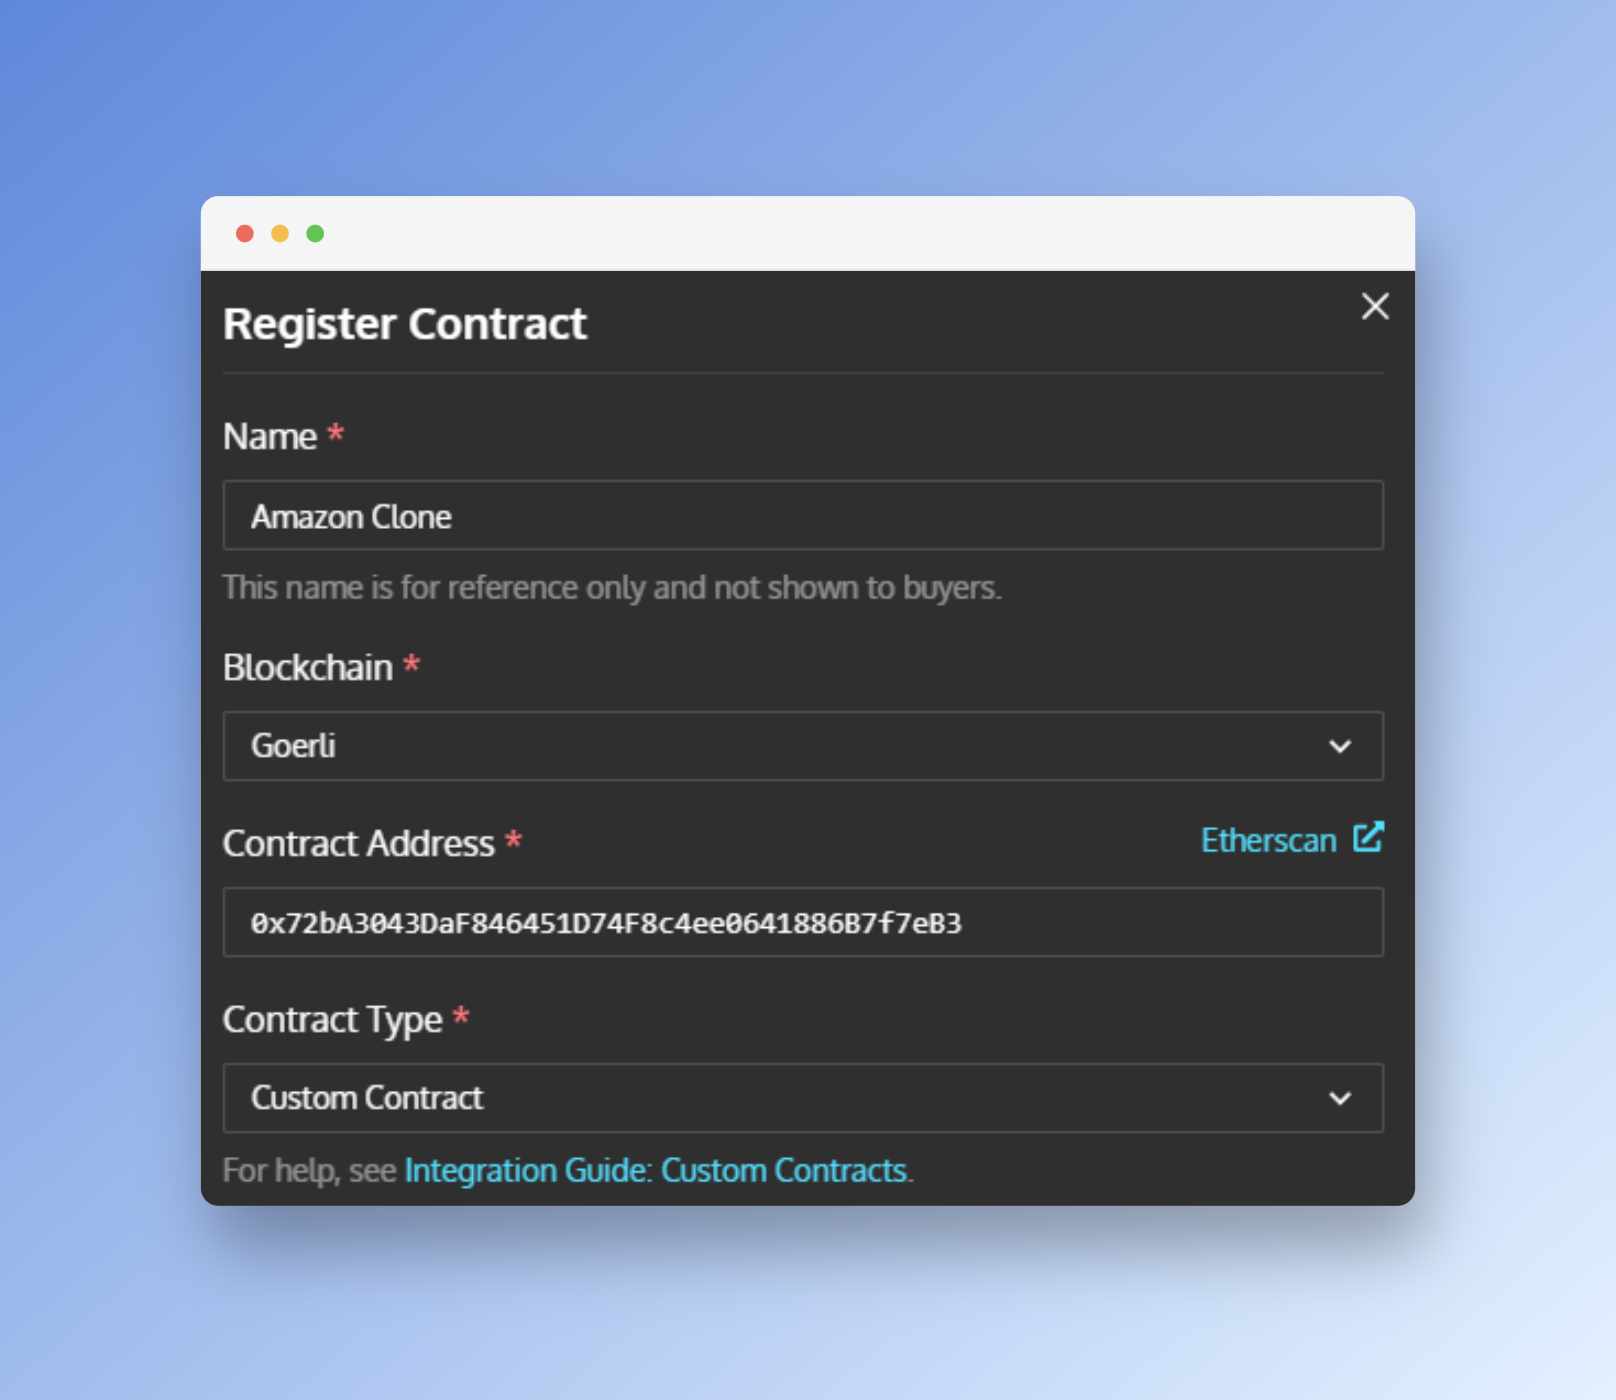
You'll be shown a modal dialog. Fill in the important details:
- Name of the contract
- Blockchain
- Contract Address
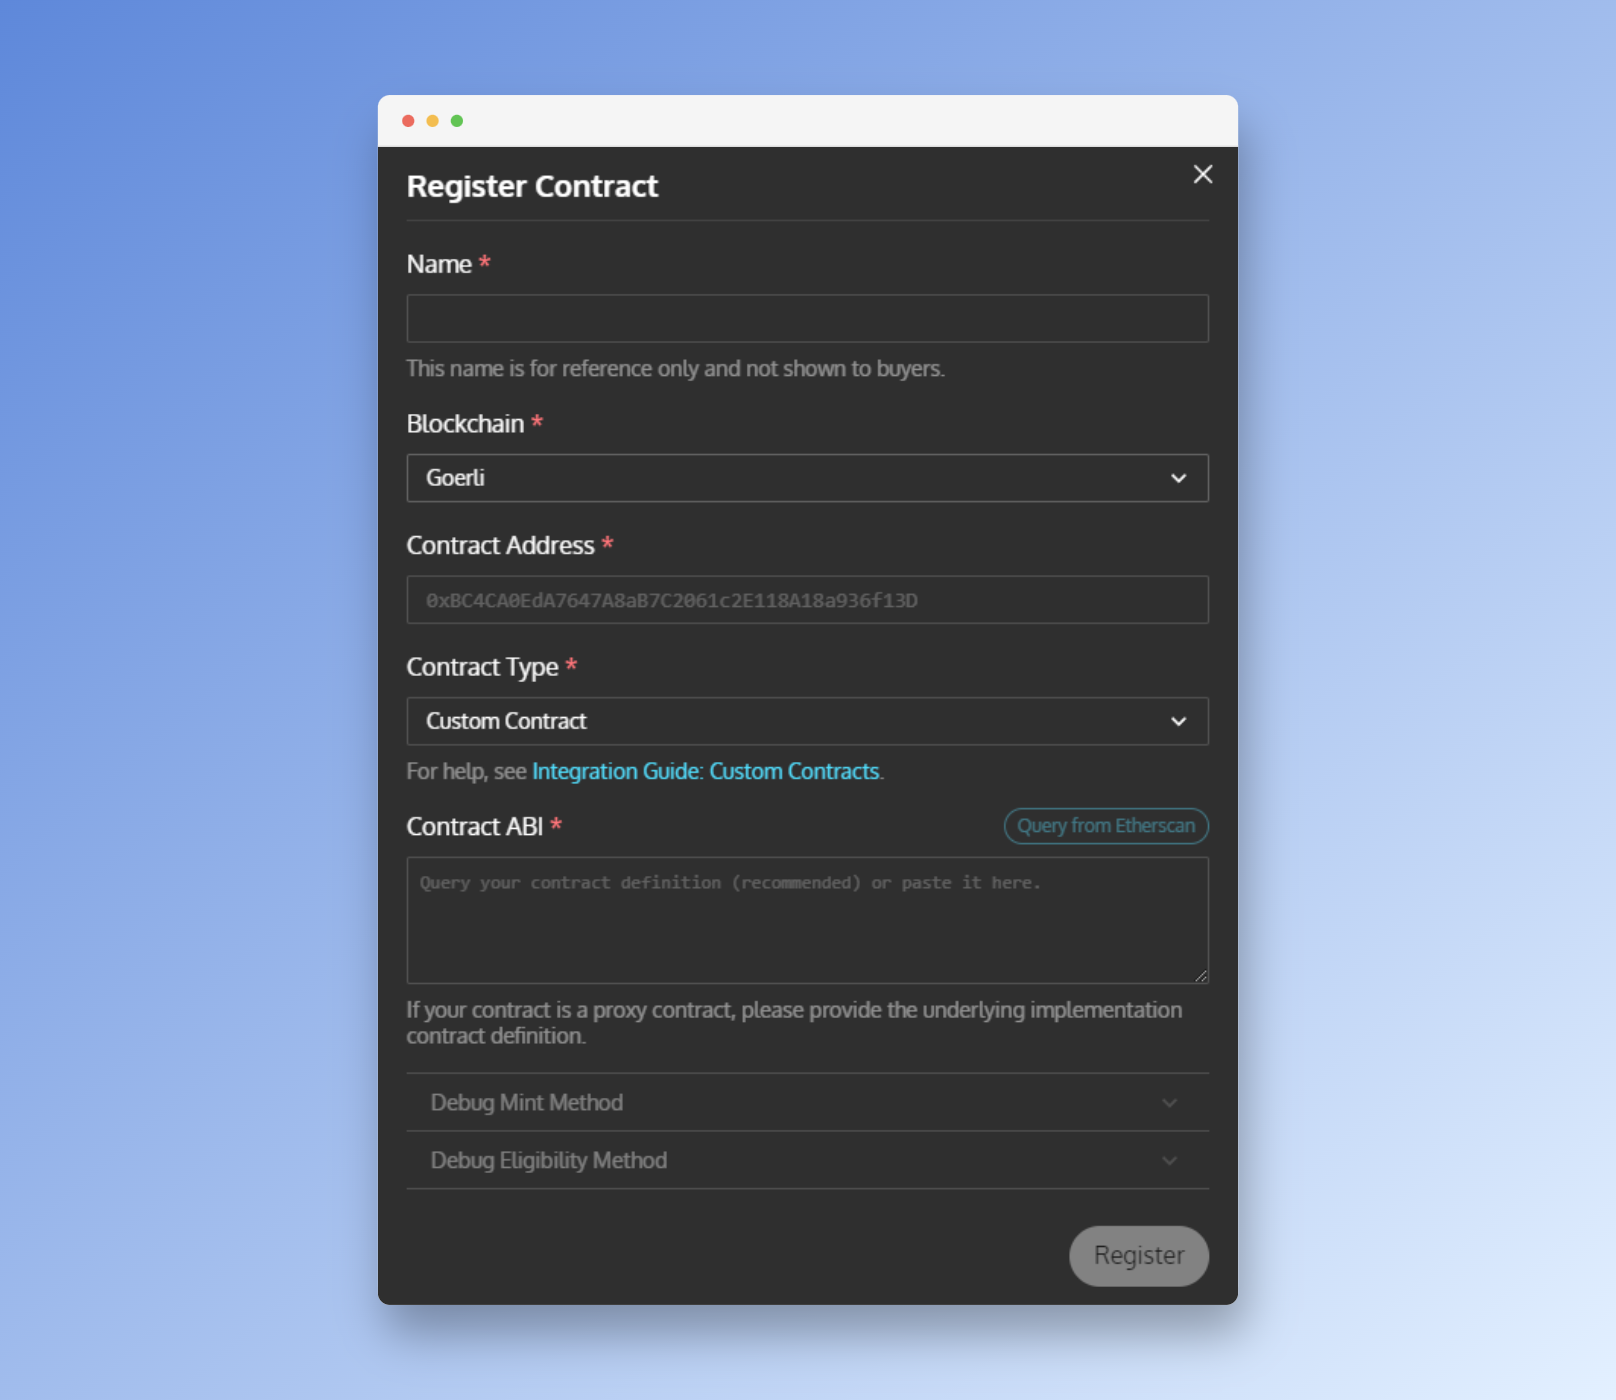
Fill in the name of your contract, the blockchain networks, and the contract address. We're using our contract, so under Contract Type, select or leave it at Custom Contract
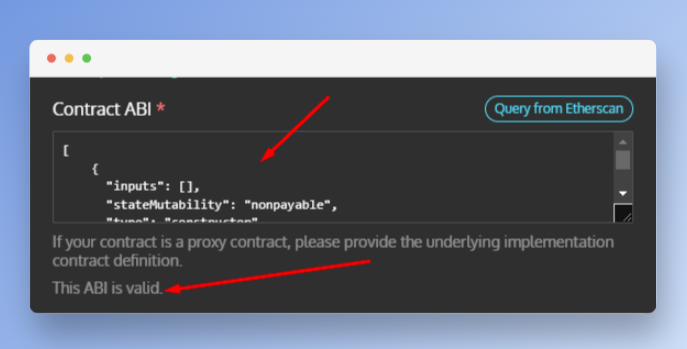
Next, we're going to copy our contract's ABI from our abi folder in our project and paste that into the Contract ABI input. Once pasted, if your ABI is valid, Paper will let you know under the Contract ABI input box:
Next, select the function that will be called when a user makes a purchase. Select the buy function from the drop-down.
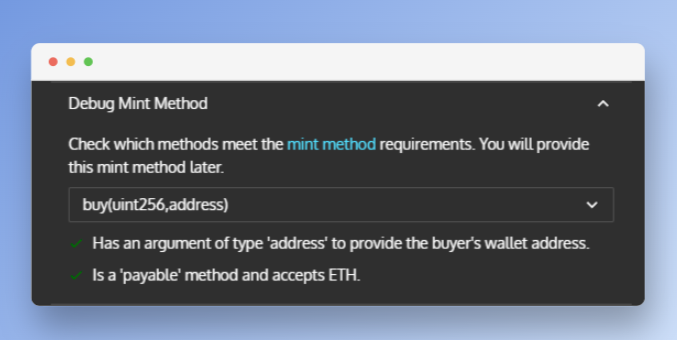
To ensure that our custom contract works as expected with Paper, we have to make sure that our contract's buy function works by Paper's Integration Guide: Custom Contracts
For example, ourbuyfunction is defined in our contract as:function buy(uint256 _id, address _buyer) public payable, we have to make sure that Paper understands how to communicate with our contract when someone wants to buy an item from our dApp.
Later, we'll look into how we tell Paper to call our buy function when someone wants to purchase an item from our dApp.Next, click on register and wait for the success notification. If everything works fine, you should see this:
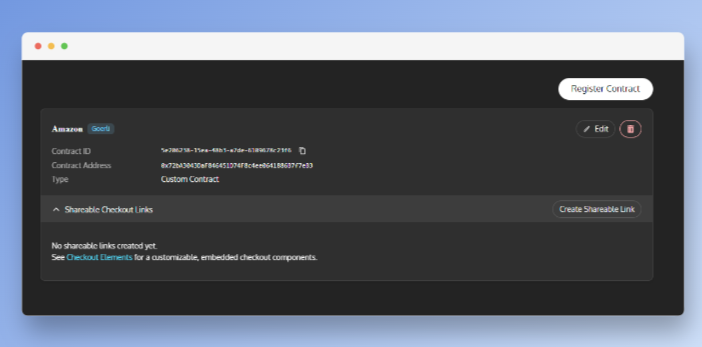
Creating Our Shareable Link
Paper provides a checkout page that users are redirected to when they want to make a payment on your site.
To obtain this checkout page, we have to create a Shareable Checkout Link from our Paper Dashboard.
Click on the Create Shareable Link button on our registered Amazon contract:
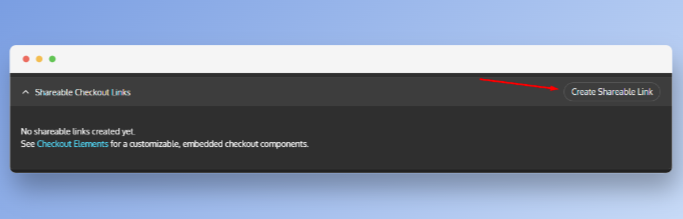
When clicked, a popup dialog will appear:
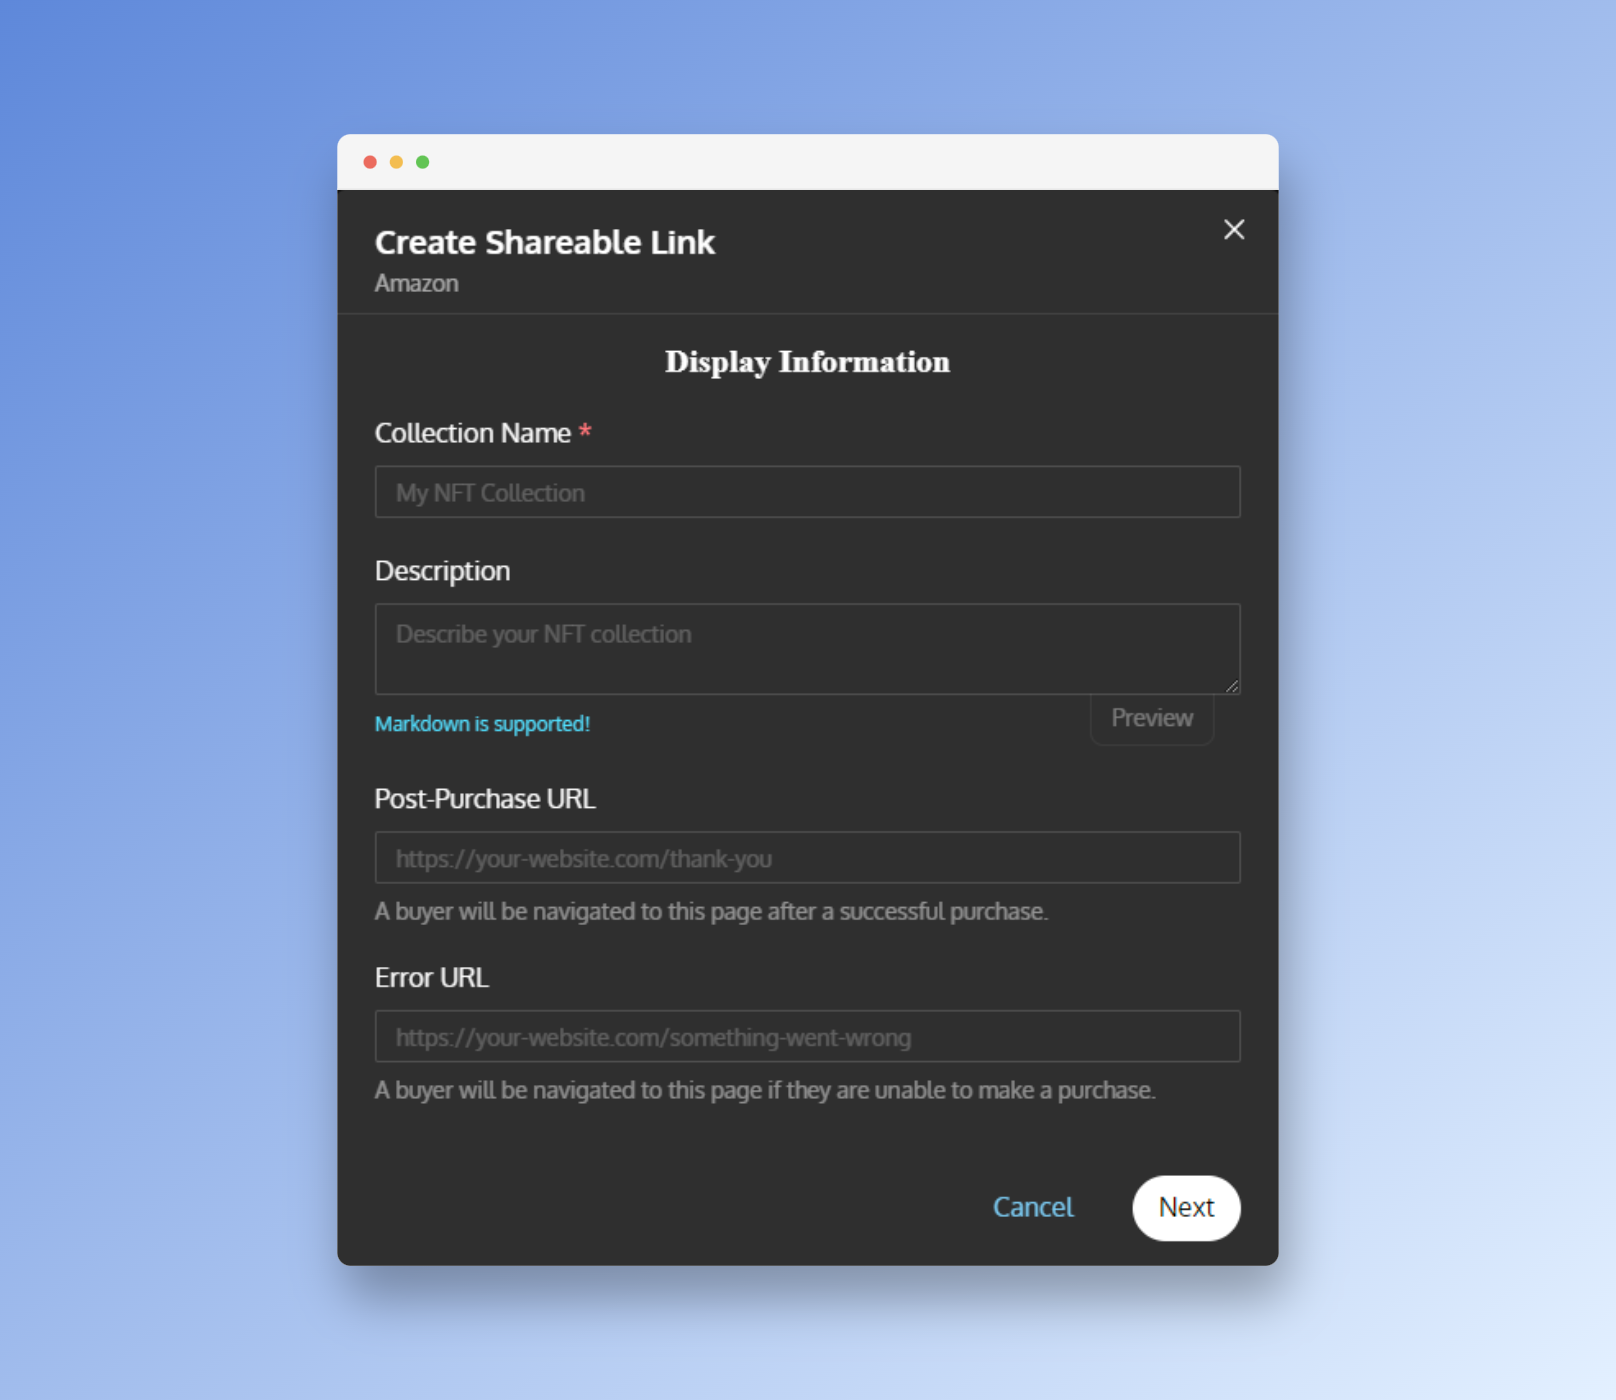
Fill in the Collection Name as the name of our app, "Amazon Clone". The remaining details are optional. In the description, we will fill in, "My decentralized Amazon clone".
Building Our dApp
Let's build our Navigation page but first, let's make sure our application is working. Run the app by running:
npm start
You should then see the homepage:
If you can see a successful launch, then our app is working so far!
To create the store page for our decentralized Amazon clone, we'll need to create four components in our src/components folder: Navigation.js, Products.js, Ratings.js, and Section.js.
Building Our Navigation Page
Let's start by building the navigation page. We'll create a top bar with a search bar and buttons for users to connect their wallets and display categories. Here's an example code snippet to create the navigation bar:
<nav>
    <div className="nav__brand">
        <h1>Amazon Clone</h1>
    </div>

    <input type="text" className="nav__search" />

    <ul className="nav__links">
        <li>
            <a href="#Clothing & Jewelry">Clothing & Jewelry</a>
        </li>
        <li>
            <a href="#Electronics & Gadgets">Electronics & Gadgets</a>
        </li>
        <li>
            <a href="#Toys & Gaming">Toys & Gaming</a>
        </li>
    </ul>
</nav>
Here's the full source code for our navigation component:
//Filename: src/components/Navigation.js

import { ethers } from "ethers";

const Navigation = ({ account, setAccount }) => {

    return (
        <nav>
            <div className="nav__brand">
                <h1>Amazon</h1>
            </div>

            <input type="text" className="nav__search" />

            <ul className="nav__links">
                <li>
                    <a href="#Clothing & Jewelry">Clothing & Jewelry</a>
                </li>
                <li>
                    <a href="#Electronics & Gadgets">Electronics & Gadgets</a>
                </li>
                <li>
                    <a href="#Toys & Gaming">Toys & Gaming</a>
                </li>
            </ul>
        </nav>
    );
};

export default Navigation;
Building Our Rating Component
Next, we want to display ratings for our products. To achieve this, we'll create a Rating component that will render a star rating based on a value passed in as a prop.
Here is the code for the Rating component:
// Filename: src/components/Rating.js

import star_regular from "../assets/star-regular.svg";
import star_solid from "../assets/star-solid.svg";

const Rating = ({ value }) => {
    return (
        <div className="rating">
            <img
                src={value >= 1 ? star_solid : star_regular}
                width="20px"
                height="20px"
                alt="Star"
            />
            <img
                src={value >= 2 ? star_solid : star_regular}
                width="20px"
                height="20px"
                alt="Star"
            />
            <img
                src={value >= 3 ? star_solid : star_regular}
                width="20px"
                height="20px"
                alt="Star"
            />
            <img
                src={value >= 4 ? star_solid : star_regular}
                width="20px"
                height="20px"
                alt="Star"
            />
            <img
                src={value >= 5 ? star_solid : star_regular}
                width="20px"
                height="20px"
                alt="Star"
            />
        </div>
    );
};

export default Rating;
We can then use the Rating component in our Products component to display a star rating for each product.
Building Our Listings Component
Let's now move on to building our listings component in src/Section.js. In this component, we will display our products along with their details, including their name, rating, image, and cost in Ether.
To accomplish this, we will make use of the ethers library from the ethers.js package to convert the product cost from Wei (the native currency of Ethereum) to Ether.
In addition, we will also utilize the Rating component we previously built to display the product's rating.
Here's the code for our Section component:
//Filename: src/components/Section.js

import { ethers } from "ethers";

// Import the Rating component
import Rating from "./Rating";

const Section = ({ title, items, togglePop }) => {
    return (
        <div className="cards__section">
            <h3 id={title}>{title}</h3>

            <hr />

            <div className="cards">
                {items.map((item, index) => (
                    <div
                        className="card"
                        key={index}
                        onClick={() => togglePop(item)}
                    >
                        <div className="card__image">
                            <img src={item.image} alt="Item" />
                        </div>
                        <div className="card__info">
                            <h4>{item.name}</h4>

                            {/* Render the Rating component */}
                            <Rating value={item.rating} />

                            {/* Convert the product cost to Ether */}
                            <p>
                                {ethers.utils.formatUnits(
                                    item.cost.toString(),
                                    "ether"
                                )}{" "}
                                ETH
                            </p>
                        </div>
                    </div>
                ))}
            </div>
        </div>
    );
};

export default Section;
Building Our Product Page
Next, we're gonna build out our product page. Our product's page will be rendered when the user clicks on an item in the Sections listing page.
Let's create the basic structure for our component:
//Filename: src/components/Product.js

import { useEffect, useState } from "react";
import { ethers } from "ethers";

// Components
import Rating from "./Rating";

import close from "../assets/close.svg";

const Product = ({ item, provider, account, contract, togglePop }) => {
    return <></>;
};

export default Product;
As you can see we're using several props in this component namely: item, provider, account, contract, and togglePop
We're passing the contents of our items via the item prop to our product component as well as our web3 wallet provider and the user's wallet address via account.
Also, note that we're importing our Rating component to display the product's rating on our products page.
First, we'll have to have a state variable for storing and getting our orders and one for storing if the user has already bought the item they're viewing. We will retrieve this information from our smart contract:
const [order, setOrder] = useState(null);
const [hasBought, setHasBought] = useState(false);
Next, we want to write the function that fetches the product's details from our smart contract:
const fetchDetails = async () => {
    const events = await contract.queryFilter("Buy");
    const orders = events.filter(
        (event) =>
            event.args.buyer === account &&
            event.args.itemId.toString() === item.id.toString()
    );

    if (orders.length === 0) return;

    const order = await contract.orders(account, orders[0].args.orderId);
    setOrder(order);
};
In this snippet above, we're:
- loading our
buyevent from our contract to get the wallet addresses of users that have bought an item. - fetching all orders from our smart contract and filtering by our
item id. - fetching the order detail by the order id retrieved from our smart contract.
Next, we will create a useEffect hook to call the fetchDetails function:
useEffect(() => {
    fetchDetails();
}, [hasBought]);
To ensure our UI updates when the hasBought state variable changes, we need to include it in our component's dependencies array for useEffect. This will trigger a re-render when hasBought changes.
Moving forward, we will define the buyHandler function which will execute when a user purchases an item from our dApp.
const buyHandler = async () => {

   // Buy item...
   ...

   setHasBought(true)
}
To enable our users to checkout with their credit cards, we'll integrate Paper Checkout into our buyHandler function. To do this, we need to import the renderPaperCheckoutLink function from the PaperSDK.
You can add the following import statement at the top of your file:
import { renderPaperCheckoutLink } from "@paperxyz/js-client-sdk";
This function will allow us to trigger Paper's checkout page inside our app. Before we can call the renderPaperCheckoutLink function, we need to supply renderPaperCheckoutLink with a checkoutLinkUrl, which can be generated by calling Paper's Checkout Service from our backend. For now, let's focus on making a fetch request to our Next JS backend service.
const result = await fetch("/api/amazon", {
    method: "POST",
    body: JSON.stringify({
        name: item.name,
        describe: item.description,
        id: item.id.toString(),
        amount: item.cost.toString(),
        image: item.image,
    }),
}).then((res) => res.json());
In the code snippet above, we pass our product details to our backend server that we will create shortly. The fetch request above returns:
{
    "checkoutLinkIntentUrl": "<https://withpaper.com/checkout-link-intent/eyJhbGciOiJIUzI1NiIsInR5cCI6IkpXVCJ9.eyJjb250cmFjdElkIjoiNWUyMDYyMzgtMTVlYS00OGIzLWE3ZGUtNjEwOTY3OGMyM2Y2IiwicXVhbnRpdHkiOjEsInVzZVBhcGVyS2V5IjpmYWxzZSwiZmVlQmVhcmVyIjoiQlVZRVIiLCJtZXRhZGF0YSI6e30sImV4cGlyZXNJbk1pbnV0ZXMiOjE1LCJoaWRlQXBwbGVQYXlHb29nbGVQYXkiOmZhbHNlLCJ1c2VDaGVja291dERvdENvbSI6ZmFsc2UsInRpdGxlIjoidGVzdCIsImNhcHR1cmVQYXltZW50TGF0ZXIiOmZhbHNlLCJicmFuZERhcmtNb2RlIjpmYWxzZSwiYnJhbmRCdXR0b25TaGFwZSI6ImxnIiwiYnJhbmRDb2xvclNjaGVtZSI6InBpbmsiLCJtaW50TWV0aG9kIjp7Im5hbWUiOiJidXkiLCJhcmdzIjp7Il9pZCI6MSwiX2J1eWVyIjoiJFdBTExFVCJ9LCJjYWxsT3B0aW9ucyI6eyJnYXNQcmlvcml0eSI6Im1lZGl1bSJ9LCJwYXltZW50Ijp7ImN1cnJlbmN5IjoiRVRIIiwidmFsdWUiOiIwLjAwMSJ9fSwic2VuZEVtYWlsT25UcmFuc2ZlclN1Y2NlZWRlZCI6dHJ1ZSwiZGVzY3JpcHRpb24iOiJ0ZXN0IiwiaW1hZ2VVcmwiOiIiLCJ0d2l0dGVySGFuZGxlT3ZlcnJpZGUiOiIiLCJoaWRlUGFwZXJXYWxsZXQiOmZhbHNlLCJoaWRlRXh0ZXJuYWxXYWxsZXQiOmZhbHNlLCJoaWRlTmF0aXZlTWludCI6dHJ1ZSwiaGlkZVBheVdpdGhDYXJkIjpmYWxzZSwiaGlkZVBheVdpdGhDcnlwdG8iOmZhbHNlLCJoaWRlUGF5V2l0aElkZWFsIjp0cnVlLCJzZW5kRW1haWxPbkNyZWF0aW9uIjpmYWxzZSwibGltaXRQZXJUcmFuc2FjdGlvbiI6NSwicmVkaXJlY3RBZnRlclBheW1lbnQiOmZhbHNlLCJyZXF1aXJlVmVyaWZpZWRFbWFpbCI6ZmFsc2UsInByaWNpbmdEZXRhaWxzIjp7ImNoYWluTmFtZSI6IkdvZXJsaSIsImN1cnJlbmN5QWRkcmVzcyI6IjB4MDAwMDAwMDAwMDAwMDAwMDAwMDAwMDAwMDAwMDAwMDAwMDAwMDAwMCIsImN1cnJlbmN5U3ltYm9sIjoiRVRIIiwicmVhZGFibGVQcmljZSI6IjAuMDAxIiwicHJpY2VJbldlaSI6eyJ0eXBlIjoiQmlnTnVtYmVyIiwiaGV4IjoiMHgwMzhkN2VhNGM2ODAwMCJ9LCJsb2NrZWRQcmljZVVzZENlbnRzIjoxODB9LCJ0cmFuc2FjdGlvbklkIjoiNWU1MzVjMzgtMDA0MC00ZmEyLTgwOWQtYWIyMGIyOGZlMDA3IiwiaWF0IjoxNjg0MTA0NzcyLCJleHAiOjE2ODQxMDU2NzIsImlzcyI6InBhcGVyLnh5eiJ9.MA-9IKN2fUX64MMZR7i_zsrgIXTm-ZtIM5A45ufylyo>",
    "transactionId": "5e535c38-0040-4fa2-809d-ab20b28fe007",
    "estimatedPrice": {
        "value": "5.73",
        "currency": "USD"
    }
}
Then, we add our renderPaperCheckoutLink and pass the checkoutLinkUrl returned from our server to it:
renderPaperCheckoutLink({
    checkoutLinkUrl: result.checkoutLinkIntentUrl,
});
The updated buyHandler function would look like the following:
const buyHandler = async () => {
    const result = await fetch("/api/amazon", {
        method: "POST",
        body: JSON.stringify({
            name: item.name,
            describe: item.description,
            id: item.id.toString(),
            amount: item.cost.toString(),
            image: item.image,
        }),
    }).then((res) => res.json());

    renderPaperCheckoutLink({
        checkoutLinkUrl: result.checkoutLinkIntentUrl,
    });

    setHasBought(true);
};
Next, we will write the JSX for our product's page UI. Let's start by writing out the skeleton of our product's page:
<div className="product">
    <div className="product__details">

    </div>
</div>
Next, we'll define our product's image section:
<div className="product__details">
     <div className="product__image">
        <img src={item.image} alt="Product" />
    </div>
    ...
</div>
Notice that we're using the image source from our item prop. Moving on, let's define the product overview section, which will display the name, ratings, description, and price of the product:
<div className="product__details">

    ...
    <div className="product__overview">
          <h1>{item.name}</h1>

          <Rating value={item.rating} />

          <hr />

          <p>{item.address}</p>

          <h2>{ethers.utils.formatUnits(item.cost.toString(), 'ether')} ETH</h2>

          <hr />

          <h2>Overview</h2>

          <p>
            {item.description}

            Lorem ipsum dolor sit amet consectetur adipisicing elit. Minima rem, iusto,
            consectetur inventore quod soluta quos qui assumenda aperiam, eveniet doloribus
            commodi error modi eaque! Iure repudiandae temporibus ex? Optio!
          </p>
     </div>
</div>
We've provided the remaining code for the Product component, so you don't have to worry about it. You can now move on to building the next component in the application.
The finished Product page should look like this:
// Filename: src/components/Product.js

import { useEffect, useState } from "react";
import { ethers } from "ethers";
import { renderPaperCheckoutLink } from "@paperxyz/js-client-sdk";

// Components
import Rating from "./Rating";

import close from "../assets/close.svg";

const Product = ({ item, provider, account, contract, togglePop }) => {
    const [order, setOrder] = useState(null);
    const [hasBought, setHasBought] = useState(false);

    const fetchDetails = async () => {
        const events = await contract.queryFilter("Buy");
        const orders = events.filter(
            (event) =>
                event.args.buyer === account &&
                event.args.itemId.toString() === item.id.toString()
        );

        if (orders.length === 0) return;

        const order = await contract.orders(account, orders[0].args.orderId);
        setOrder(order);
    };

    const buyHandler = async () => {
        const result = await fetch("/api/amazon", {
            method: "POST
To enable the checkout functionality for our store, we will integrate Paper's One-Time Checkout API. This API allows us to generate unique checkout links that can be used for individual products.
Each checkout link will include specific details such as the product name, description, and price. Leveraging the One-Time Checkout API is particularly advantageous when developing checkout pages for product-centric applications.
To obtain the checkout URL, we need to create a backend server using Next.js Server and establish communication with Paper from there.
You might be wondering why a backend server is necessary for our dapp. The answer is simple: security. To interact with Paper's checkout service, making API calls from the backend is crucial. Exposing our API keys on the frontend could lead to potential theft and misuse. Utilizing a backend server is the best way to safeguard our API keys.
To set up the backend, navigate to the src/pages/api directory and rename the default home.js file to amazon.js. Open the amazon.js file and modify the handler function to be asynchronous by adding the async keyword to the function declaration.
export default async function handler(req, res) {}
Next, import the ethers library:
import { ethers } from "ethers";
Next, we will destructure the req.body object:
const { amount, id, name, description, image } = JSON.parse(req.body);
Also, we have to make sure that we're checking only for a POST request from the frontend:
if (req.method === "POST") {

    ...
}

return res.status(200).json({ message: "Amazon Clone Backend" });
Next, in our if block, we will make a fetch request to Paper's checkout service to request our One-Time Checkout URL. Let's define the headers for our request:
const headers = {
    "Content-Type": "application/json",
    Authorization: "Bearer <YOUR API KEY>",
};
You can find our API key in your Paper dashboard at your Developer Settings
Next, let's write our fetch request:
const result = await fetch(
    "<https://withpaper.com/api/2022-08-12/checkout-link-intent>",
    {
        method: "POST",
        headers,
        body: JSON.stringify({
            contractId: "a665a877-595c-49ef-b84a-23c947059438",
            title: name,
            description: description,
            imageUrl: image,
            expiresInMinutes: 15,
            limitPerTransaction: 5,
            redirectAfterPayment: false,
            sendEmailOnCreation: false,
            requireVerifiedEmail: false,
            quantity: 1,
            metadata: {},
            mintMethod: {
                name: "buy",
                args: {
                    _id: id,
                    _buyer: "$WALLET",
                },
                payment: {
                    currency: "ETH",
                    value: ethers.utils.formatUnits(amount.toString(), "ether"),
                },
            },
            feeBearer: "BUYER",
            hideNativeMint: true,
            hidePaperWallet: false,
            hideExternalWallet: false,
            hidePayWithCard: false,
            hidePayWithCrypto: false,
            hidePayWithIdeal: true,
            sendEmailOnTransferSucceeded: true,
        }),
    }
).then((res) => res.json());
The contractId field can be found on your Paper Dashboard in the Contracts section. This is the id of the contract we registered earlier.
As you can see by now, there's a lot going on in the snippet above. You don't have to worry about everything in the snippet, the most important thing to take a look at are these fields:
{
    mintMethod: {
        name: "buy",
        args: {
            _id: id,
            _buyer: "$WALLET",
        },
        payment: {
            currency: "ETH",
            value: ethers.utils.formatUnits(amount.toString(), "ether"),
        },
    },
}
This part of our integration tells Paper how to interact with our smart contract. The mintMethod object contains important information about our contract and how it should be interacted with.
The name property in the mintMethod object is our buy function from our smart contract:
function buy(uint256 _id, address _buyer) public payable
The args property contains the parameters of our buy function and we pass an environment variable: $WALLET
The environment variable $WALLET is configured automatically by Paper
The payments property tells Paper how we want to receive payments from our users. For our currency, we want to receive our funds in ETH. The value property is the amount that will be charged to our users for a particular product.
Some additional fields to keep in mind are these:
hidePayWithCard: false,
hidePayWithCrypto: false
we're setting these two properties to false because we want our users to be able to checkout with both their crypto wallets and their credit cards.
Finally, let's finish up our API by returning the data to our frontend:
return res.status(200).json(result);
Here's our complete amazon.js file:
//Filename: src/pages/api/amazon.js

import { ethers } from "ethers";

export default async function handler(req, res) {
    const { amount, id, name, description, image } = JSON.parse(req.body);

    if (req.method === "POST") {
        const headers = {
            "Content-Type": "application/json",
            Authorization: "Bearer 0e34a80f-d00d-40fc-8c58-837b6fb4f106",
        };

        const result = await fetch(
            "<https://withpaper.com/api/2022-08-12/checkout-link-intent>",
            {
                method: "POST",
                headers,
                body: JSON.stringify({
                    contractId: "a665a877-595c-49ef-b84a-23c947059438",
                    title: name,
                    description: description,
                    imageUrl: image,
                    expiresInMinutes: 15,
                    limitPerTransaction: 5,
                    redirectAfterPayment: false,
                    sendEmailOnCreation: false,
                    requireVerifiedEmail: false,
                    quantity: 1,
                    metadata: {},
                    mintMethod: {
                        name: "buy",
                        args: {
                            _id: id,
                            _buyer: "$WALLET",
                        },
                        payment: {
                            currency: "ETH",
                            value: ethers.utils.formatUnits(
                                amount.toString(),
                                "ether"
                            ),
                        },
                    },
                    feeBearer: "BUYER",
                    hideNativeMint: true,
                    hidePaperWallet: false,
                    hideExternalWallet: false,
                    hidePayWithCard: false,
                    hidePayWithCrypto: false,
                    hidePayWithIdeal: true,
                    sendEmailOnTransferSucceeded: true,
                }),
            }
        ).then((res) => res.json());

        return res.status(200).json(result);
    }

    return res.status(200).json({ message: "Amazon Clone Backend" });
}
Let's run our app:
npm run
Our finished application should look like this:
If you'd like to skip all those steps, and fork the repo directly, you can do so here.
For more information on Paper's products, you can visit our website here.
We make web3 onboarding easy for your users, by allowing them to checkout with credit card, create email-based wallets, and receive NFT airdrops directly to their email addresses.